Workspace and Users
Workspace represents a testing program, such as a profession or school. Each FastTest account comes with one workspace and one administrator account for that workspace.
- Users (item authors, etc.) are then assigned to a workspace by the administrator.
- Each workspace must have at least one administrator, meaning that if an additional workspace is required to keep different parts of your testing program completely separate, you must purchase additional administrator licenses.
- Note: multiple banks can be created within a workspace, and different users within an organization can be assigned access to only designated banks.
Workspace
The workspace is the highest level in the hierarchy of your testing program. Each workspace contains item banks, which contain categories (domains), which contain items.
- For example, a school district might set up two separate workspaces, one for internal formative testing and the other for official summative testing; each workspace would have banks for each subject (e.g. Science or Math); then each item bank would have categories to organize items on the subject (e.g. Biology, Chemistry, and Physics). However, users of the internal workspace would not have access to the official testing workspace.
- The user accounts within a workspace are created and managed by the workspace administrator.
- Non-administrative users are taken directly into their workspace and will only have access to the item banks and tests available to them.
Workspace Homepage

Creating New Users
- Click New User
- Information tab
- First name, last name and email address are required. Other fields shown are optional.
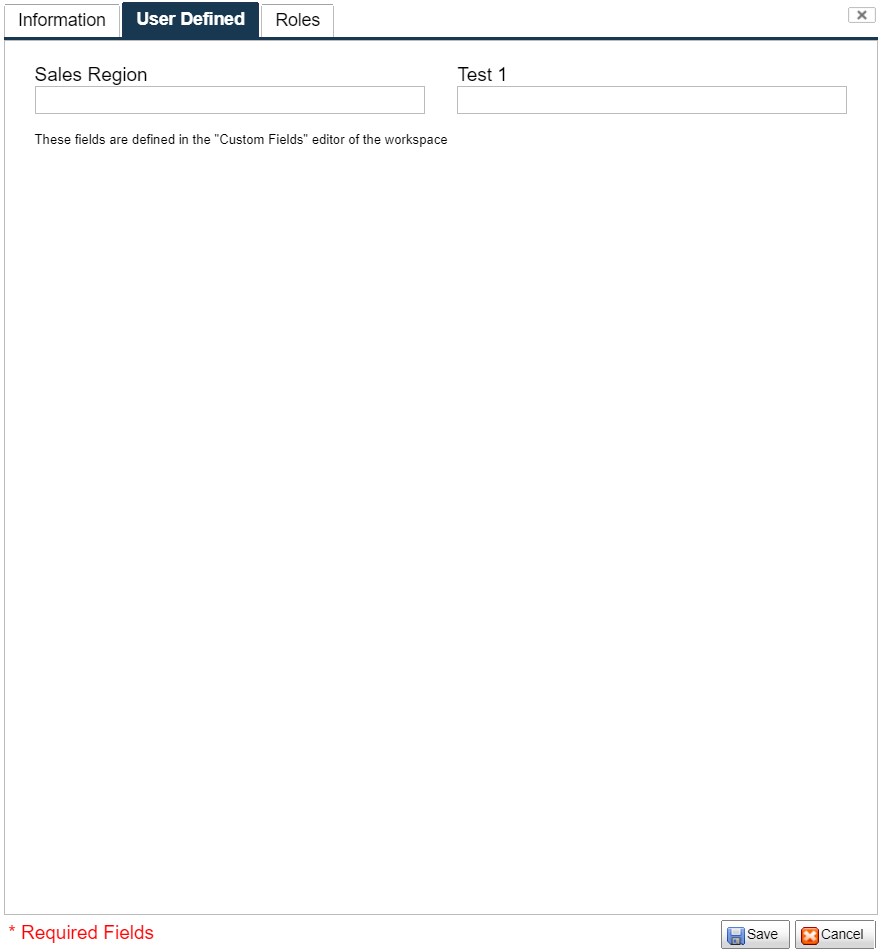
- User Defined tab
- Contains custom fields that have been created in the “custom fields” editor accessible from the workspace homepage
- Information tab

- Roles tab
- Choose the appropriate role(s) for the user
- Workspace role is optional
- Item bank level role is required
- Determine Item Bank access
- Note: the system defaults to “No Banks”, which restricts access from all items
- Determine Content Hierarchy access
- Note: system defaults to “No Content”
- If Content Hierarchy exists (set-up at the Admin level) then users must be given access to content on some level to gain access to items.
- Choose the appropriate role(s) for the user

Configuration
The Configure button controls the metadata of the workspace.
- Change the skin of the workspace
- Upload logo
- Note: A logo file that is large in size may decrease the speed of each screen loading.
- Modify which data fields are displayed regarding users (see below)
- Other options include setting the workspace IRT D (Item Response Theory) scaling factor and giving labels the user defined statistic fields for items.
Figure 2.2: Workspace Configuration

- The Asset Properties tab provides the option to prevent creating assets that have duplicate names.
- If this box is unchecked it will prevent assets from being created/updated individually or when uploading a zip file.

- The Delivery Properties tab provides options regarding Test Code emails, Group Test Codes, and the Test Session Results Reports.
- The Default Test Codes Email – Use this field to enter an email address/es that will receive a copy of all Test Code Emails generated by the system.
- Email Templates – Set up Email Templates

- Examus URL(s) – this is used for the creation of Test Links using the Examus Proctoring Software.
- The Default Test Results Email can be used to enter an email address(es) that will receive a blind copy of all Test Result Emails.
- Test Call Back URL – Use the Test Completion Callback URL to be notified each time an examinee completes a test. When an examinee completes a test, a POST request will be made to this URL.


Content Hierarchy
Content hierarchy is used to categorize and organize items. Users are able to create nested folders based on topic, knowledge area, or any other categorical structure. Administrators can control user access by assigning content areas. Content hierarchy is 100% customizable, and is therefore a very powerful tool.
Usage
- From the Administration page, select Content Hierarchy. A new tab will open.
- Create a content hierarchy based upon your assessment needs. Name the area and click Save.
- Create additional content areas by selecting the green plus signs – there is no limit to the number of levels.
- Once the content hierarchy is created, close the tab.
- Within the workspace, create item banks and categories.
- Under the Information tab in the item editor, assign items to a content area as they are created.
- Note: There is also an option to import an existing content hierarchy.
- Clicking Import will open the dialog box shown below
- Click to download the sample import file if needed

- Existing content hierarchy can also be be utilized to make changes
- Click Export, make adjustments and save the .xlsx file
- Import the updated file by clicking Import
Example
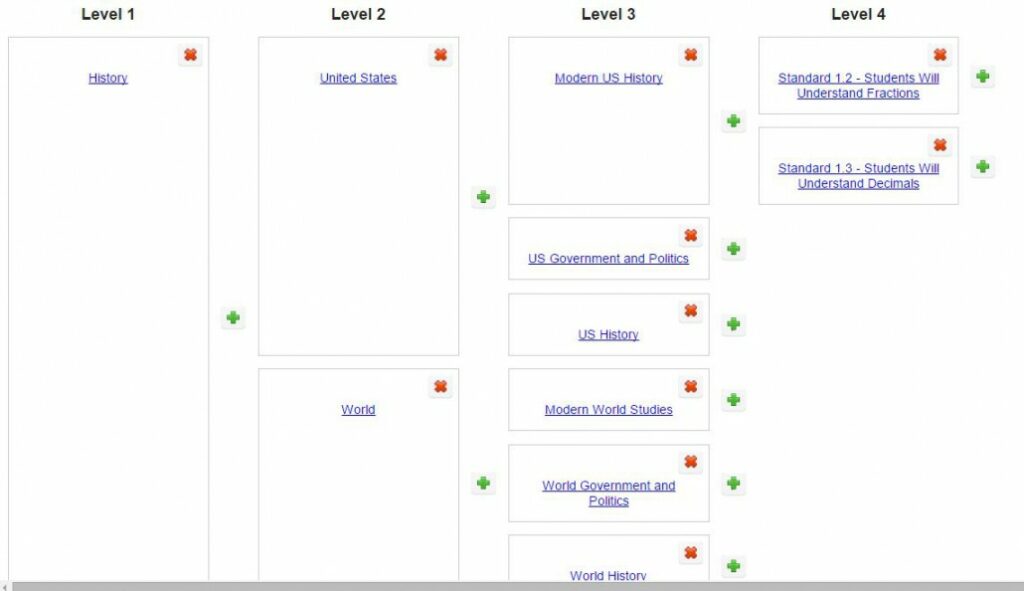
The following example is based upon a hypothetical school situation in which teachers may be assigned to review items based on grade and/or subject. Therefore, we will have a Content Hierarchy based on subject, and Item Banks based on grade. In the example below Level 1 is History. If a user was creating a content hierarchy for an entire school, he/she might have a number of subjects listed as Level 1 content areas. Each level of content breaks down the content areas into more specific categories.
In this example:
Level 1 (first level) is the subject History,
Level 2 (second level) is an area of History i.e. United States History
Level 3 (third level) is a class within the area of United States History i.e. Modern US History.
Item Banks
Create meaningful item banks and categories to distinguish where certain items are held. See below for an example.

This example includes a content area called Modern US History (in hierarchy, level 3). There is also a folder within the item bank Grade 11 called Modern US History. Having both of these labels could be valuable in assigning roles, because a teacher could be assigned to only Grade 11 items (and therefore they would only see US Modern History and World Government and Politics) or could be assigned to the content area (within the hierarchy) of Modern US History. This way the teacher would only see the items within that content area.
Assigning content areas allows Admin Users to restrict user access on a much larger scale.
It is important to note that users cannot be assigned to item categories (folders). Access for users is limited to Item Bank Level.
Item Creation
As items are created, nest them appropriately in their respective category. See below for an example.

Also assign items to an area within the content hierarchy. See below for an example.

A newly created item will not automatically be assigned a place within the content hierarchy. However, if you duplicate an item, it will retain its assignment within the hierarchy.
User Access
- From the workspace administration page, select New User (or select User to Edit).
- Under the Roles tab, restrict user access as required – see examples below:
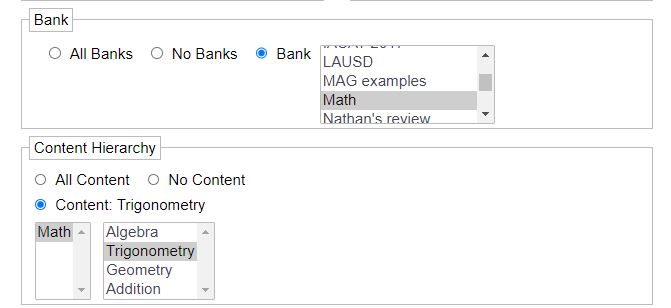
This user will see all content for Math.

This user will see Math – Trigonometry.
Custom Fields
Description
The Custom Fields button, (next to the Workflow Mgmt. button),

allows you to define custom fields for:
Users, Items, Tests, and Examinees.

For example, all items might be associated with a “Task objective.” You could then create a field called Task Objective, which would appear in the Item Editor for each item. Another example for a custom field could be; all users might have a “Security status,” which can be created here as a User Custom Field.
Figure 2.3: New Custom Field Dialog
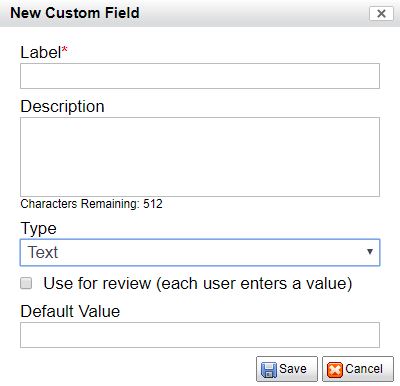
The image above shows the dialog for defining custom fields. Each custom field has a required name with optional description and default value. The type of the custom field can be specified to give the user a better experience when inputting a value. For example, a date type custom field will have a calendar widget associated with it. The available types are:

A custom item field can also be used “for review.” For cases when it is desirable to get input from multiple users (such as Angoff Index), the custom field can be used for review by checking the box “Use for review”. Normally, each item has a single value associated with it for each custom field, but review fields allow for any privileged user to add a value to the field.
Note: custom fields used for review do not have default values.
Once you have finished your review process and collected Angoff ratings, you can right click an Item Bank and select Export > Review Field. The spread sheet generated will have a row for each item and a column for each logged in user who added a value to the review field.
Custom examinee fields will appear in the Edit Examinee Dialog and can be used when developing a Demographics Screen in the Edit Test Options Dialog. They will also appear as columns in the Export Examinee Data .CSV export, accessible on the Test Scheduler tab.
Users
Description
The bottom part of the screen you see in Figure 2.1 pertains to the management of users. A list of users for the workspace is presented here. The columns visible in this list are controlled by the check boxes in Figure 2.2. You can see that the sample workspace in the figure has two users, Napoleon Bonaparte and Julius Caesar.
Usage
- Click on the New User button to create a new user or Edit User to edit an existing user. Either button will bring up the window shown below.
- Specify personal information regarding a user and specify his or her roles (shown below in Figure 2.5) and a password for the user. Fields marked with a red asterisk (*) are required.
- Note: that you need both a first and last name for each user; this is because the user ID will be created with those names. The default login is the first letter of the first name and the last name (with spaces removed). For example, if the user’s name is John Smith, the default login is: jsmith.
The User Defined tab displays custom fields that were defined by the workspace administrator using the Custom Fields functionality.
Figure 2.4 Edit User Dialog
User Roles
There are six roles for a user in addition to workspace administrator. Users can be assigned in Figure 2.5 to any number of roles to specifically delineate what they are allowed to do in the workspace.
Figure 2.5: User Roles Screen
These roles can be modified at a later date. This allows you to set up new users with limited access to start with, such as a read-only Browse User, until they become familiar with the system. The user can then be given more access. The following table further delineates available functionality.
| Workspace Level Roles | Details of Access |
| Workspace Administrator | The Workspace Administrator role has access to all areas in the workspace, including the ability to create users and item banks. |
| Test Creator | The Test Creator role has access to create and edit tests. |
| Test Scheduler | The Test Scheduler role has access to schedule examinees to take tests and view their results. |
| Item Marker | The Item Marker role has access to the Item Marker tab for the scoring of hand marked items. |
| Item Bank Level Roles | Details of Access |
| Bank Manager | The Bank Manager role has access to create new categories in the bank, in addition this role can create new items, edit existing items and delete any item. |
| Item Editor | The Item Editor role grants has access to to edit any item in the bank, create new items, and delete any items created by them. |
| Item Reviewer | The Item Reviewer role has access to comment on items in the bank. |
| Browse User | The Browse User role has read-only access to all items in the bank. |
| None | The None User role will not have access to item banks. |
Remember that multiple roles can be assigned to specifically control what users can do.
- For example, the Test Creator can only create tests and edit test metadata; they cannot add items to assemble tests because they do not have rights to view the item bank.
- This role is intended to manage existing tests or create new tests that await assembly by other users.
- If you want the user to also be able to assemble tests, you can add the “Browse User” role to their account, which will allow them to browse through the item bank to select items for tests.
If all users have been set up as necessary, and you have created any custom fields you need, you can proceed to Enter Workspace.