Building a Test Form
Building a test form in FastTest involves several key steps to ensure accuracy and relevance. From selecting appropriate items to organizing them in a logical sequence, this process is essential for creating assessments that accurately measure knowledge and skills.
Selecting Items for a Test
Once you have created the test and specified the basic information, the next step is to add items to test sections.
To Add Items
- Click the Edit → Edit Items button, or right-click on a test and select Edit Items.
- This will then bring up a list of items already added to the test (Figure 4.14). There will be no items listed for a newly created test.
- The list of items is also visible simply by highlighting a test on the Test Assembler tab
- Adding and deleting of items to the test is not possible while the test is protected.
- Click on the Item Explorer tab to access the items you want to add to the test.
Figure 4.14: The Test Item List
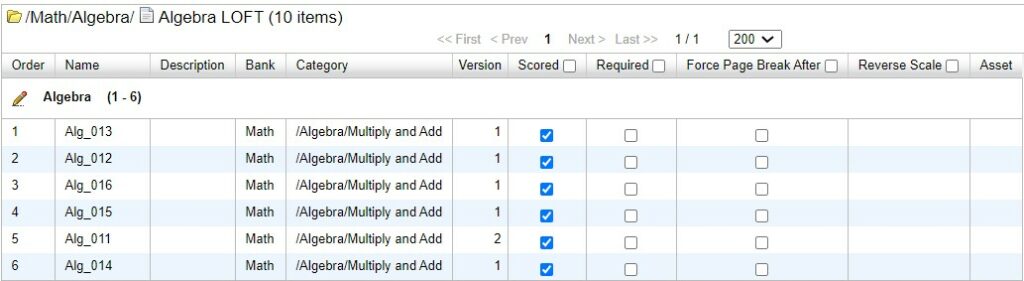
Figure 4.14 displays some additional options that items have once they are added to a test.
- The Scored checkbox indicates if the response to this item should be included in the score calculation.
- The Required checkbox indicates whether this item is required to be answered.
- The Force Page Break checkbox allows you to insert a page break after a specific item.
- The Reverse Scale checkbox applies to Likert-Type items and allows you to use the reverse of what the examinee selected.
- For example, if you have a five point scale with weights of 1, 2, 3, 4, and 5, applying reverse scale would cause the first option to use a weight of 5 instead of 1.
- The checkboxes in the column headers can be used to check/uncheck all checkboxes for all items in the test.
- Once the test is open for adding/deleting items, you then need to go back to the Item Explorer tab to look for items and add them to the test.
- You can go there by clicking the green Add Items button, or by simply clicking the Item Explorer tab.
- There are two ways to select items in the Item Explorer: browsing through the bank or searching on specific criteria.
Selecting Items by Browsing
You can assemble a test using any of the banks in a workspace by selecting items from any of the categories in those banks. Navigate through the workspace by clicking on banks or categories, and right-click → Show All Items to see the items in a given category.
- To add an item to your test, simply click on the item and then click the green Add to Test button that is now visible above the list or right-click and select Add to Test.
- You can also select multiple items in the list using the CTRL and SHIFT keys.
- Items that have been added will have a green plus sign next to them.
- If your test has multiple test sections, you will be prompted to select which test section the items should be added to.
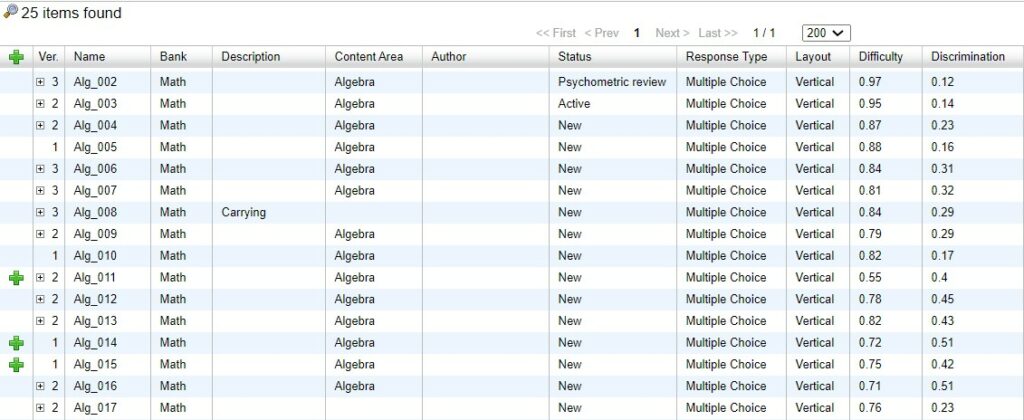
Figure 4.15: Item Explorer While Adding Items
Selecting Items by Searching
You can also select items for your test by having FastTest search your item banks for items meeting criteria that you specify. There are two ways to search.
- To perform a quick search for certain item names, type the text into the Search Items box in the upper left, then click the magnifying glass or press Enter.
- For example, in Figure 4.15 you could also pull up a list of all algebra items by searching for “alg” since that is in each item name.
- The second way to search is the Advanced Search. Use this when performing sophisticated test assembly based on item statistics or IRT parameters.
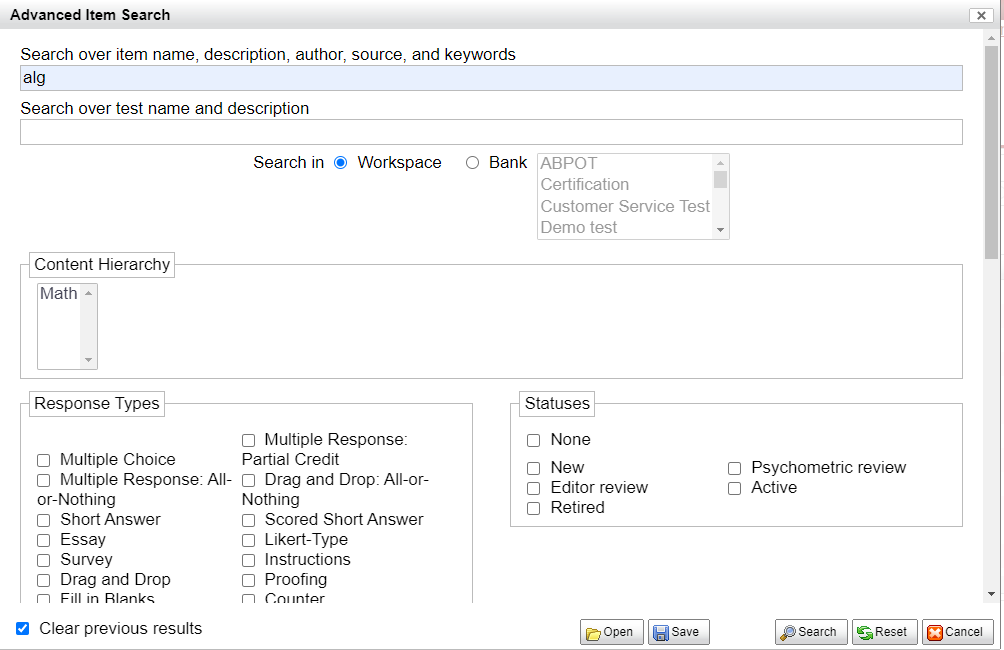
- Click on Advanced Search below the quick Search Items box, and the window in Figure 4.16 will appear.
- You can then search for text again, by item status, item assignments, date created, date modified, and/or by ranges of values for all the relevant statistics.
- Your results will then appear in the item list (Figure 4.15), at which point you can select which of the qualifying items you would like to add to the test.
- You can add to a previous search by unchecking the “Clear previous results” button.
Figure 4.16: Advanced Item Search Dialog
- Note: If you want to view the items in a test in the Item Explorer tab, right-click the test and select Show in Item Explorer
- Allows for easy access to items included in a test without having to search banks.
Adding Multiple Items and Building Test Forms
Adding Multiple Items at Once
Whether browsing through your bank structure or perusing a list that has been generated by a search, you can add multiple items at once.
- For example, suppose you search for Algebra items with an IRT a parameter of 0.8 to 1.0, and 10 items were returned.
- Using the CTRL key, you can highlight any number of items in the list, then click Add to Test only once.
- The SHIFT key acts as in Microsoft Windows, selecting all objects in a list between the two points specified.
- Items added this way will be added in the same order that they are selected.
- Items added to a test by adding an entire bank or category will be added in alphabetical order by item name.
Building Random Test Forms
For item lists either from browsing or searching, you can also randomly select any number of items.
- Right-click on the list and choose Select Random. You will then be asked to specify how many items to select.
- This process will highlight as many items in the current list as you specified.
- If you like the selection, you can click Add to Test.
This approach can be used to build entire forms randomly, or used in combination with the search criteria for stratified sampling. To build an entire form randomly, make sure the list has all items you wish to consider available.
- For example, if you want to build an Algebra test, you might drag the Algebra folder to the list window, so that all Algebra items are displayed.
- If you want a test of 50 items, then choose Select Random → 50 items.
- Note that the items will only be selected from the current page of items. You may have to increase the maximum number of rows per page via the dropdown menu above the item list.
To use stratified sampling to meet strict requirements, utilize the Search feature to narrow down the list first.
- Again, suppose you search for Algebra items with an IRT a parameter of 0.8 to 1.0, and 10 items were returned.
- You could then randomly add 5 of those items to your test.
- You then move on to Geometry items that meet the IRT requirement, and select 8 items there if that is what you need.
- The Search function serves to narrow down the items in the bank that meet given specifications from your test blueprints.
Inserting Instructions Into Your Test
FastTest inserts instructions into the test as items.
- Simply create an “item” and write your instructions as its text, then change the item type to Instructional.
- Instructional items can be entered into the test like any other “item” and moved to whatever location in the test you desire.
- You can also have as many instructional items in your tests as you like.
- For paper-based testing, if you want to start a new page before an instructional “item,” simply insert a page break at the appropriate location when viewing your test.
Also for paper-based testing, this approach can be applied to “testlets,” or test items that consist of a passage of information, followed by a number of questions about that passage, such as reading comprehension items.
For this type of item, create a separate (instructional) item for the passage and separate items for each question to be asked about the passage.
- It is recommended to store all of these items in a subsection of a bank so they can all be selected at once for inclusion in the test.
Reordering Items
There are two ways to reorder the items in your test – manually or during online delivery.
- Manually
- Start by making the first version of the test as you normally would.
- After you have the items in the order you want them for the first version of the test, save that test under another name of your choice (e.g., My Test, Form B).
- To do this, right-click on a test and select Save Test As.
- Then open the second version, click the Scramble button, and save that version of the test.
- Test Sections can be scrambled relative to other test sections and items within test sections can be scrambled.
- Test Sections can be marked as fixed so that they do not change position when a test is scrambled.
- Note: Instructional items will always remain fixed.
- Repeat this process as many times as you like for any test to create any number of scrambled alternate forms.
- You can also manually move the items up and down in position to scramble.
- Moving items manually can be done by drag-and-drop in the test item list when the test is open for editing, or by selecting an item and then using the Move button (or right click menu).
- Online Delivery
- To randomly scramble the item order for each examinee during online delivery, change the Item Order drop-down menu on the Delivery tab of the Edit Test Section Dialog.
Deleting Items from your Test
As you assemble and refine your test, you might decide to delete an item from your test.
To delete an item from a test while in the Test Assembler
- Open the test item list by right-clicking → Edit Items
- Select the item to be deleted
- Click on the red Delete button above the test list
- To be sure that you wanted to remove that item from the test, you will be asked to confirm the deletion.