Editing Items
As mentioned, items can be opened for editing by right-clicking on them in the items list or simply double-clicking them. This opens the Edit Item dialog, which has seven tabs:
- Information
- Content
- Statistics
- Comments
- Review
- Objectives
- Rubrics
An item is locked if another user currently has it open; a workspace administrator has the option to override this and unlock the item. An item will unlock automatically once a user saves or closes the item, logs out of the system, or loses the session (times out).
The Information Tab
The information Tab shown in Figure 3.4 in The Item Explorer Tab contains information about an item that is not related to content or psychometrics. The following is a list of the fields.

Custom item fields and the list of tests that use the item are also shown on the information tab. The history button will display a history of important events in the item’s history.

The Content Tab
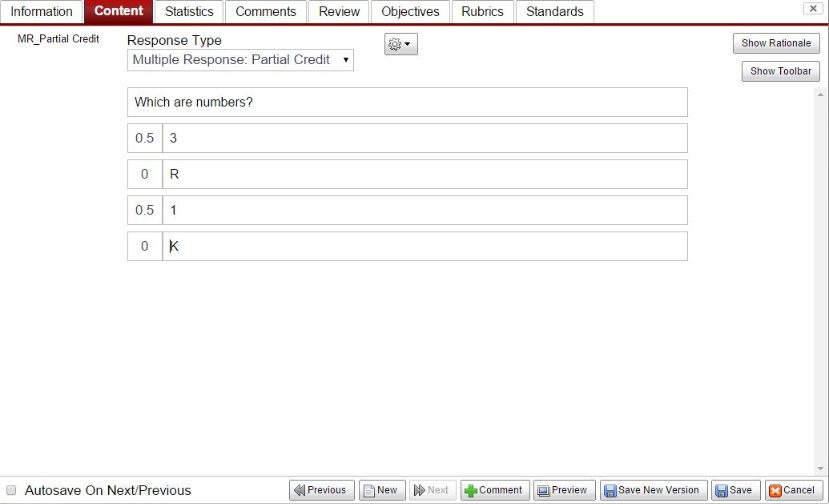
The Content Tab is where you enter the actual text of the item (shown below). The stem is entered in the box on top. To add an answer, click the Add Answer link at the bottom. The number of answers is unlimited.
Figure 3.7: Edit Item Dialog – Content Tab
The correct answer, or key, is specified by utilizing the Answer Weight field. This appears beside the answer marker in an input box.
- For conventional number-correct scoring, specify the correct answer with a weight of 1.0 and the incorrect answers with a weight of 0.0.
- The answer weight is used directly in the score calculations.
At the top of the content tab, you will see the response Type drop down. This allows you to specify which type of response is expected by the examinee. The types currently supported by FastTest are described in the table below.
Examples of each Item Response type can be found in Appendix K – Item Authoring.

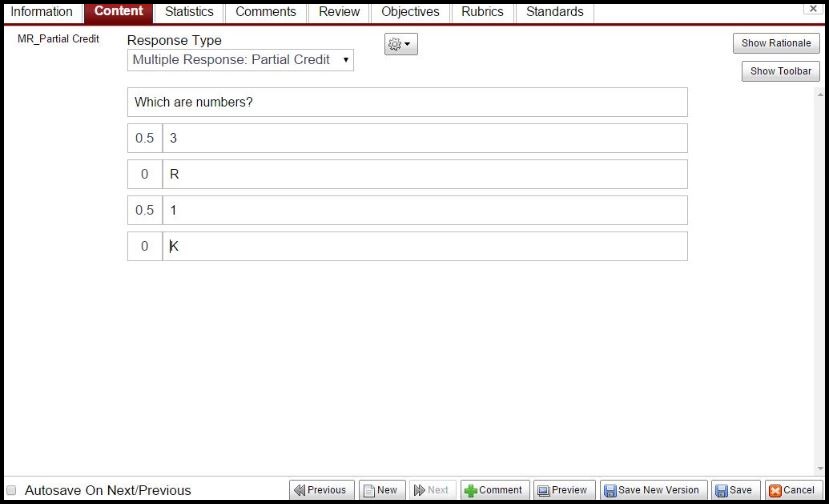
Multiple Response Options
- Partial Credit multiple response item
- Examinees will receive some credit for the correct answers they choose.
- Item writers mark which items are correct by indicating appropriate answer weights for each answer.
- For example, in the sample item below the two correct answers are each worth .5 points.
- The examinee can earn 1 point, .5 points, or 0 points on this item.
- Item writers mark which items are correct by indicating appropriate answer weights for each answer.
- Examinees will receive some credit for the correct answers they choose.

- The amount of answers selected by an examinee can be controlled by using the drop down
( ![]() ) menu located to the right of the Response Type down down.
) menu located to the right of the Response Type down down.
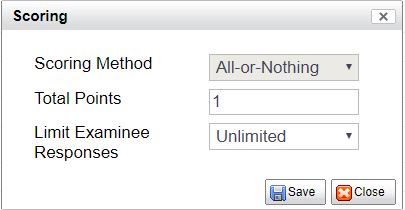
- Click on Scoring to open the window shown below Multiple Response Scoring Options.
- The Limit Examinee Responses drop down allows for examinees to only be able to select the number of responses indicated
- NOTE: Unlimited will allow for examinees to select all answers and therefore receive credit by default for having included the correct answers.
- The Limit Examinee Responses drop down allows for examinees to only be able to select the number of responses indicated
All-or-nothing multiple response item
- Examinees will only receive credit if they correctly select all of the answers that are correct
- Item writers mark which items are correct by checking the box to the left of the answer content
- For example, in the sample item below the two correct answers are indicated by the check marks
- The examinee can earn full credit or zero credit

- The credit given for each item can be specified using the drop down menu (
 ) located to the right of the Response Type down down.
- Click on Scoring to open the window shown below

- Enter in the desired Total Points for the item
- The Limit Examinee Responses drop down allows for examinees to only be able to select the number of responses indicated
- NOTE: Unlimited will allow for examinees to select all answers and therefore receive credit by default for having included the correct answers.
Each responses is given a width, a label, and a weight.
- When a test is scored, the weight of the selected response acts the same as the weight of a selected (traditional) answer.
- Optionally, either the first or the last response can be given a blank weight to act as an N/A option. The N/A option will be recorded as answered, but it will not affect the overall score. It will also be visually separated from the other responses in the scale during the online test.

- Enter in the desired Total Points for the item
- The Limit Examinee Responses drop down allows for examinees to only be able to select the number of responses indicated
- Enter in the desired Total Points for the item
- NOTE: Unlimited will allow for examinees to select all answers and therefore receive credit by default for having included the correct answers.
Likert-Type Items
Likert-Type items have a weighted scale associated with them. A scale is a re-usable set of responses.
- A scale can be defined by clicking the Create/Edit Scales link that appears on the left hand side when Likert-Type is selected.
- A new dialog will appear that shows all of your currently defined scales and allows you to create, edit, and delete scales. Creating a new scale will present you with the following dialog:
Figure 3.8: Edit Scale Dialog
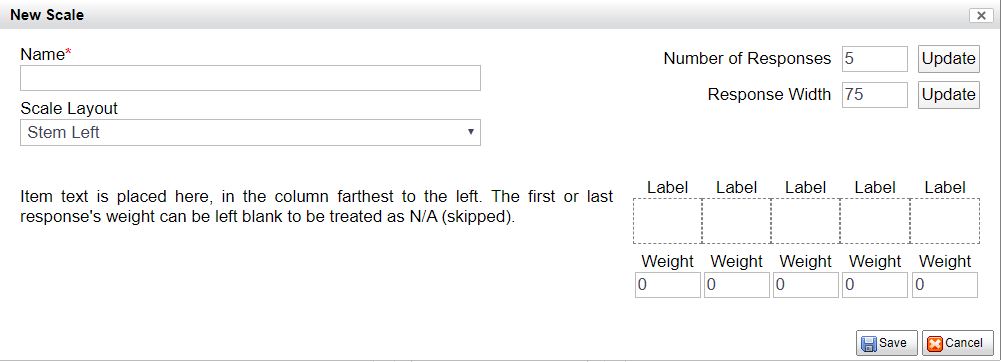
- Each responses is given a width, a label, and a weight.
- When a test is scored, the weight of the selected response acts the same as the weight of a selected (traditional) answer.
- Optionally, either the first or the last response can be given a blank weight to act as an N/A option. The N/A option will be recorded as answered, but it will not affect the overall score. It will also be visually separated from the other responses in the scale during the online test.
- Options can be given the same weight to collapse categories for IRT scoring purposes; this is typically done when IRT analysis finds that some particular options do not have sufficient numbers of respondents to calibrate with IRT (too small “sample” size) and are combined with options that have had more responses.
Scale Layout controls how the stem is placed relative to the scale:
- Stem Left
- Stem text is to the left of the scale and its radio buttons. In the testing engine, the scale labels will be printed once at the top of the page in a fixed pane and many Likert items will be able to reference that pane.
- Stem Top
- Stem text is above the scale. The stem and scale each take up the same width. The scale is repeated for each item.
- Stem Embedded
- The scale is part of the stem. Requires special modification of the underlying markup (HTML) of the item. Documentation pending.
Drag and Drop Items
Drag and drop items offer three options: Place Answers (Insert Blanks), Place Answers (Insert Lists), and Single List.
- Place Answers – Blanks and Images
- Include instructions for the item in the first box.
- The Target Container is presented to the examinee, and where they will place their answers.
- To create a target element in text, first enter in all of the text.
- If the item includes an image, insert the image(s) as well.
- The distance is the amount of pixel variance given to examinees when the Snap check box is selected.
- A low value like 20 will require the placement to be relatively exact.
- A higher value like 200 will allow the examinee to drag the element just in the area of the target and it will “snap” to the correct location.
- Highlight the text that you want to replace with a blank and select Insert Blank.
- The highlighted text will automatically be removed and replaced with a blank.
- If the blank is the last word in a sentence before a period,do not include the period when highlighting
- Note: Utilize the Preview function to ensure proper placement.
- To create a target element in text, first enter in all of the text.
Figure 3.9: Place Answers – Blanks and Images

- Enter the key(s) and distractors in the answer boxes below.
- The answer weight for the keys/correct responses must be great than 1. Incorrect answers/distractors are weighted 0.
- Only answers given a weight greater than 1 will be options for placing correct answers.
Figure 3.10: Answers and Weights
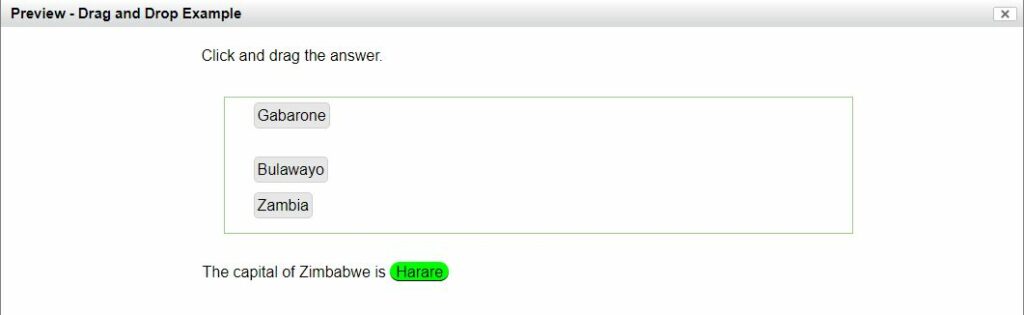
Click on Place Answers to open the Place Answers Window, shown below.
- The answers previously given a weight greater than 1 will be available to drag and drop to the correct blank or be placed on an image.
- Drag your answers from the top box to the desired location in the question below.
- In the example, we have dragged “Harare” to the target zone in “The capital of Zimbabwe is ___________.” Harare is the the capital of the Zimbabwe.
- Place-able zones on images are created based on where you place the correct answer and the distance you set using the drop-down in the Item Editor window.
- The distance is the amount of pixel variance given to examinees when the Snap check box is selected.
- A low value like 20 will require the placement to be relatively exact.
- A higher value like 200 will allow the examinee to drag the element just in the area of the target and it will “snap” to the correct location.
- The distance is the amount of pixel variance given to examinees when the Snap check box is selected.
- Clicking Save will return you to the Item Editor.
- Click Save to finish creating the item.
Figure 3.11: Place Answers Window
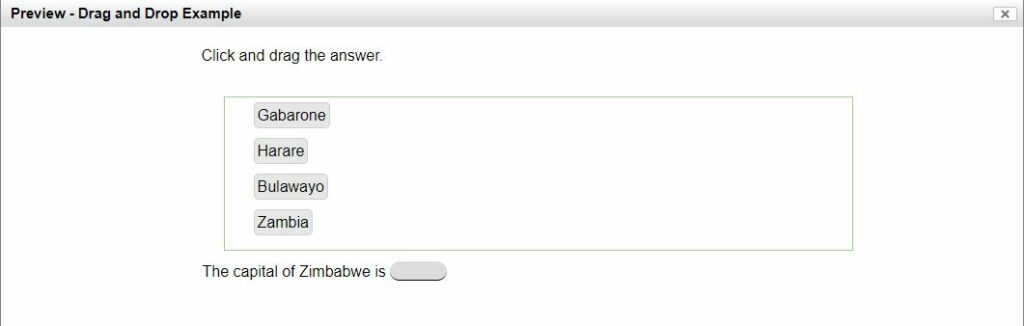
Figure 3.12: Place Answers – Exam View

- Place Answers – Lists
- Multiple lists can be included in an item by using the Insert List button
- Include instructions for the item in the first box
- Prepare the Target Container by entering all surrounding text
- Note: Leave ample line breaks so that the text is not disrupted when the list is inserted.
- Place your cursor appropriately and click Insert List. A green box will appear in the Target Container.
- Enter your answers and weights
Figure 3.13: Place Answers – Lists

Click Place Answers to open the Place Answers window
- Answers weighted greater than 1 will be able to be shown in the top box
- Place the answers in the correct lists and click Save to return to the Item Editor
Figure 3.14: Lists Place Answers Window
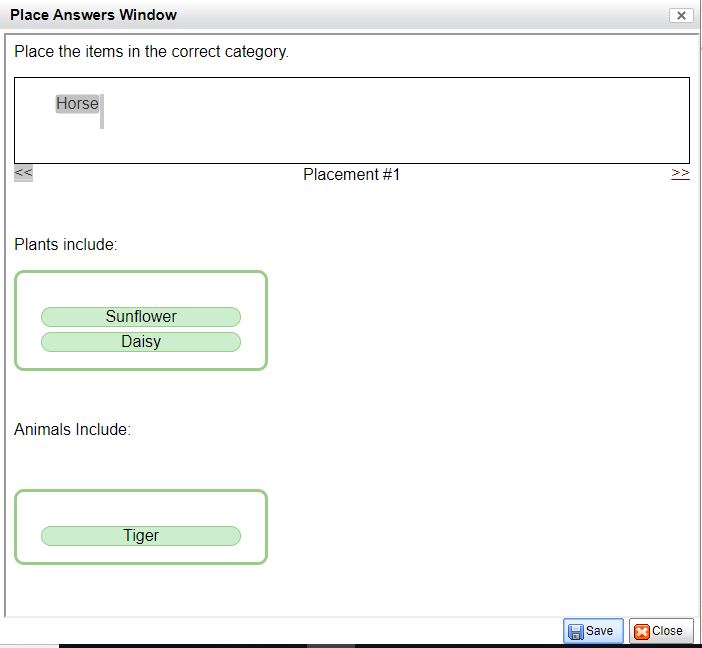
Figure 3.15: Place Lists Exam View
Single List Item Response
- Type the instructions or question for the item in the top box.
- Type the desired target list title into the Target Container box
- This labels the area into which the examinee will drop their answers.
- In the example below the title is ‘Cities Located in Minnesota
- This labels the area into which the examinee will drop their answers.
- Provide the key(s) and distractors in the answer boxes.
- Key(s)/correct answers must be given a weight greater than 0 (i.e. .25, .5, 1, etc)
- Distractors/incorrect answers are weighted 0.
- Set the List Limit using the drop down option located towards the top of the Window.
- The chosen number is the amount of maximum answers the examinee is allowed to place in the Target Container.
- For example, if you are asking them to select 2 from a list of 5, the List Limit is 2.
- Note: If this goes unaltered, examinees could get credit by dragging all options into the box.
- The chosen number is the amount of maximum answers the examinee is allowed to place in the Target Container.
Figure 3.16: Single List Response Type

- Figure 3.13 depicts how the drag and drop list response type is presented in an exam to an examinee.
Figure 3.17: Single List Exam View

Proofing
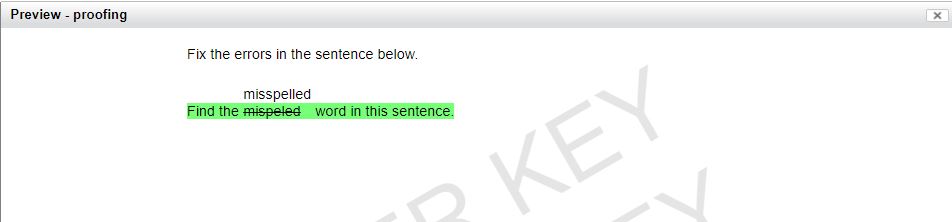
- Type your item instructions or general question in the top box
- The Target Container contains the text that the examinee will be editing.
- Type the text including the errors that need to be identified and corrected.
- You can then select the text elements that you wish to be editable or modifiable. To create a text element, use your cursor to highlight the word(s), sentence, etc.
- Once highlighted, click the PR button on the toolbar (). This will create an editing option for the examinee.
- To add the correct answer (correction to be made by examinee) to the error, click on the text element with the error and then click Add Answer.
- Type the correct response.
- In the example below, “too” is corrected to “two.”
- Note: If browsers have automatic spell check turned on misspelled words will be underlined, thus giving away the answers. Spell check will need to be disabled for exams containing Proofing items.
Figure 3.18: Creating a Proofing Item

- Proofing items are presented to the examinee as shown below.
- The examinee clicks on the error, and a box appears above for the examinee to type the correction into.
Figure 3.19: Proofing Item Exam View
Fill in the Blank
- Enter the appropriate text in the top box
- Instructions, reading passage, etc.
- In the Target Container, enter the text that will include the blanks
- Wait to insert blanks until all text is entered to maintain correct formatting
- Place the cursor where the blank will go and click Insert Blank
- Only the blank highlighted in green corresponds to the keyed answers shown below
- Use the arrows (<<) below the Target Container to move between blanks and keyed answers
- Make sure to enter keyed answers for each blank
- Use the preview function to view all blanks with corresponding keyed answers
- Note: Spelling is taken into account when scoring.

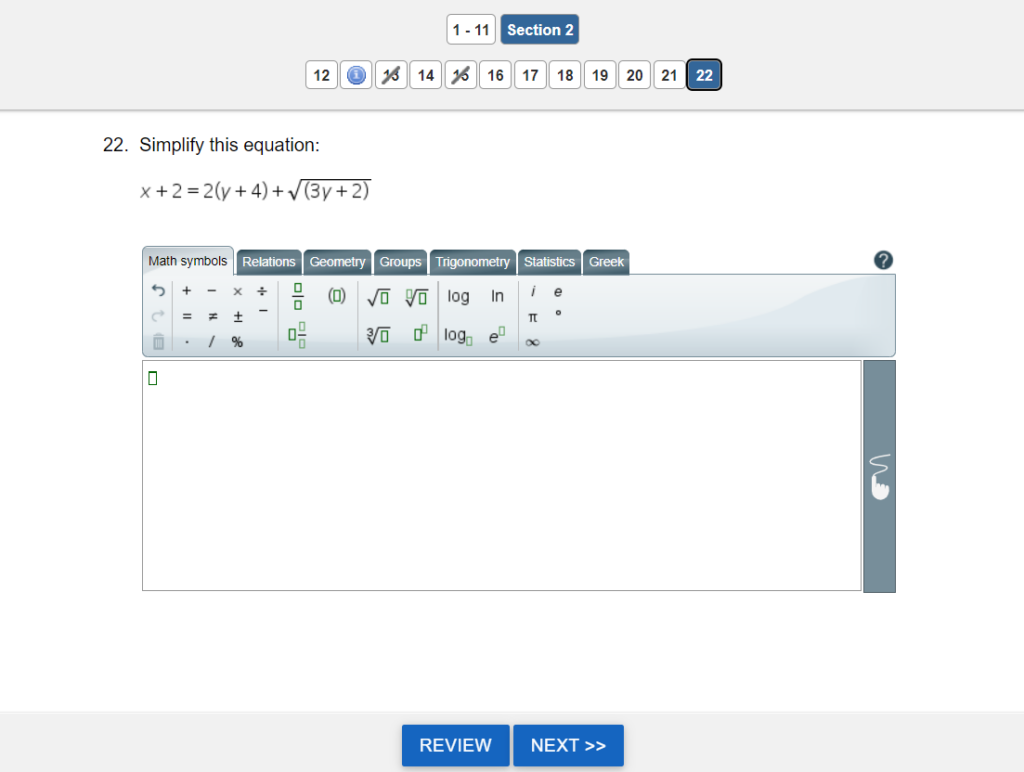
Math Equation Item Type
The Math Equation response type is an open-response format similar to an essay. It provides an equation editor to the students for them to create an equation, which is then saved for grading in the Essay Marker module by a teacher.
Create the item with the interface below. There is an option to “Allow text with Equation” which means that the student can type explanations, essentially an Essay item with the option to insert an equation. If that box is unchecked, the response will simply be the equation editor alone. The “Standard” refers to which level of equation editor you want to provide to students: Grades 3-5 (simple), Grades 6-8 (intermediate), or high school/university (advanced).
If you are scoring this item in the Essay Marker module, don’t forget to assign Rubrics and set up the marking session.

The equation editor item type will render for examinees like you see below.
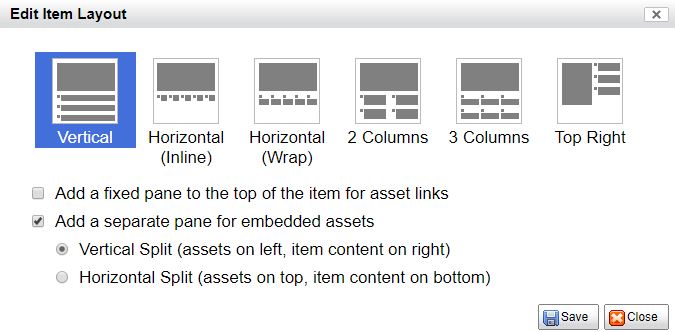
Item Layout
Next to the Response Type is Item Layout. Clicking the button brings up a new dialog with layout options, as seen below:
Figure 3.20: Edit Item Layout

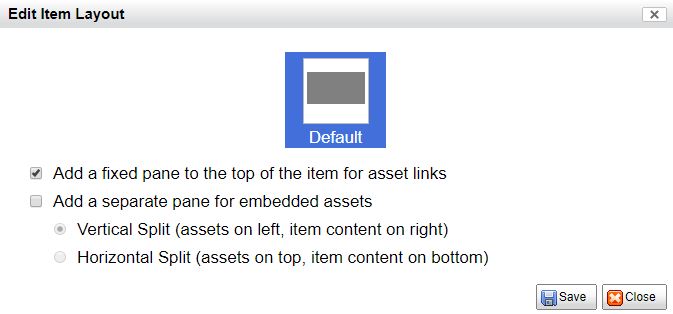
Two check boxes exist for adding an Asset Links Pane and/or adding a separate assets pane that creates a Split-Pane View (See below).
- The Answer Marker is where to specify whether the answers should be marked A-B-C-D or 1-2-3-4, or follow the format of whatever test the item is used in.
- The Show Rationale button toggles the display of rationale entry boxes in the editor.
- Rationale can be specified at the item level and/or for each response (boxes under the stem/response).
- Above each answer, buttons exist for reordering and deleting that answer.
The Content Tab includes a complete set of text formatting buttons as you would see in a word processing application. Click the Show Toolbar button to make it visible. You can change:
- Font
- Alignment
- Create bulleted lists
- Insert symbols and equations
- Highlight text
A description of each button is visible as a hint if you let your cursor hover over the button.
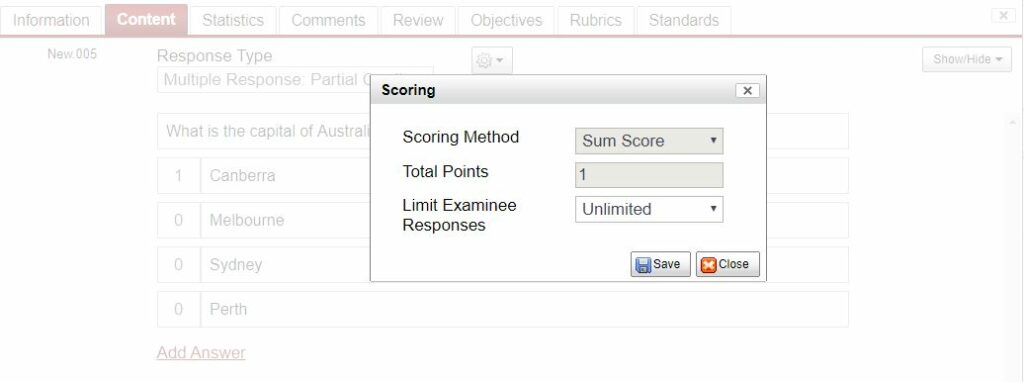
Scoring and Rationale options
- The Scoring button controls how the item is scored within a test
- Sum scored (default)
- Unscored
- Item will not be taken into account when scoring a test
- Hand scored
- An admin or user must enter a score for the item after it has been delivered
- Items that are scored using Rubrics must be set to – hand scored
- Requires re-scoring a test after hand scored items have been given a score

- The Show Rationale button allows item writers to include rationale when creating an item
- Extra text fields appear under the stem and each answer (shown below)
- Can be viewed when previewing a test under the Test Assembler tab
- Rationale statements are included in the solutions key that can optionally be shown to examinees after completing a test

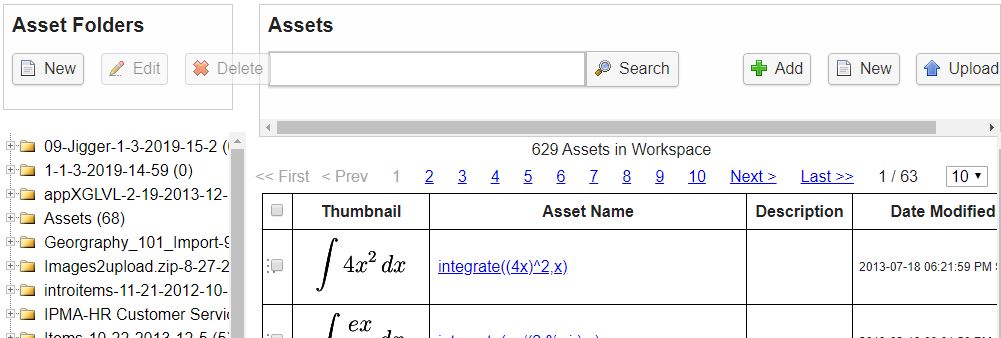
The Asset Manager
Your test items can include multimedia such as graphic images (pictures), audio files, and video files.
FastTest supports:
- Images include: .jpg, .png, and .gif files
- Video files include .avi, .flv, and .mpg.
- Audio files are supported in the .mp3 or ogg. format.
- Text (html)
- PDF files (currently available for use as reference materials – see Test Assembler)
- Adobe Illustrator (.ai) files can also be uploaded with the option to convert to png or jpg.
- The maximum size of uploaded multimedia files is 100 MB.
- Multiple assets can be uploaded at once through a zip file.
To add an asset (multimedia) to an item:
- Click the Insert/Edit Multimedia button in the toolbar (
 ).
).
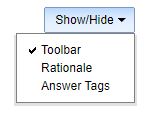
NOTE: If the Tool Bar is not visible click on the Show / Hide Button, and select Toolbar.
- This will open the Asset Manager window. The Asset Manager stores all of the files that have been uploaded within your workspace, making them easy to reuse across items.
- Select the asset you want to use and click Add.
- Close the Asset Manager window.
Figure 3.21: Asset Manager
To upload a new asset
- Individual Asset Upload
- Open the Asset Manager
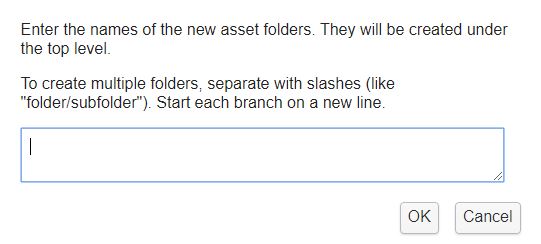
- Select the folder you want to upload to, or create a new folder by clicking on New under Asset Folders
- Clicking New will display the screen shown in Figure 3.22
- Input a name (required) and a description (optional)
- Select the type of file that will be uploaded using the drop-down
- Click Choose File to browse and select a file
- Clicking Upload Batch will display the screen shown in Figure 3.23
- Batch upload requires a zipped file that contains only supported file types
- The upload will fail if the zipped file contains 1 or more unsupported files
- Batch upload requires a zipped file that contains only supported file types
- Clicking Save will upload the file and it will then appear in the folder
- A batch upload may take more time. Refresh the page to show the new assets
- Note: Create a folder structure to better organize the workspace’s assets.
- Can easily move assets between folders by dragging
- Assets are automatically arranged in alphabetical order
Figure 3.22: Uploading a New Asset Folder
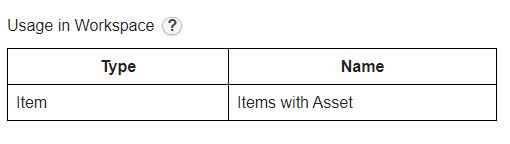
- You can preview an asset by clicking on it.
- This page also allows you to edit the asset name, description, replace the asset by uploading a new file under the same name, and/or download the asset.
- The table at the bottom of the page details the asset’s usage in the workspace.
- For example, in the image below the asset is being used in an item named “Items with Asset.”

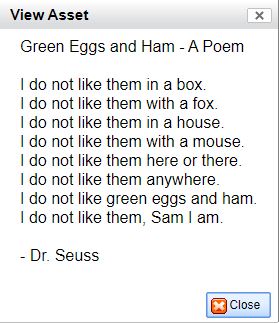
Text Assets
- A text asset could be used to represent a reading passage that is used by multiple items.
- Text assets are created using a rich text editor (much like items).
- To create a new text asset, select New → Text Asset.
- A dialog will appear with Name and Description and the rich text editor for entering the text (shown below).
- To get existing documents into a text asset, copy and paste directly into the rich text editor and clean up the formatting as needed.
Figure 3.23: Text Assets
Editing Assets
- Once an image has been inserted, its size can be changed by selecting the image in the text and then clicking the Insert/Edit Image button in the toolbar.
- This will bring up a dialog that allows specification of the height/width of the image.
- (Note if only the height or width is specified, the image will automatically scale to maintain the aspect ratio.) Audio and video cannot currently be resized.
- This will bring up a dialog that allows specification of the height/width of the image.
- To replace an old file in the Asset Manager select Replace File → Choose File.
- Optionally, the new file can be previewed before saving.
- Note: the asset WILL be replaced in all items it is currently used in, including within protected tests.
- If the replaced asset is not showing in the item editor, reload the page and/or log out and log back in.
- Additionally, workspaces have the option to be configured to show/edit asset links while previewing an item.
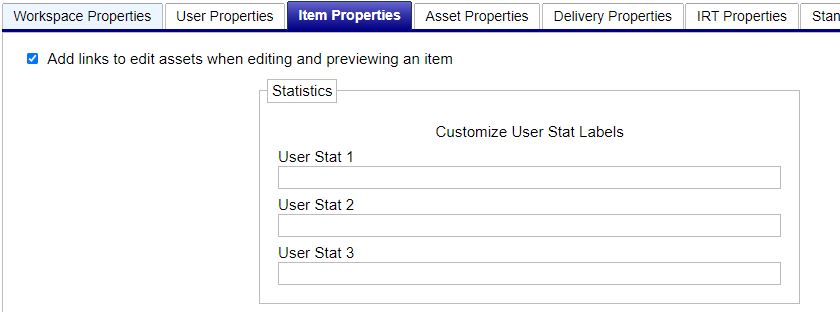
- To preview an asset, click Configure -> Item Properties -> Add links to edit assets when previewing an item.
Other Methods of Associating Assets with Items
Assets can be inserted directly into the item text, but this can be insufficient if the asset is very large or needs to be reused across items. FastTest offers two additional ways of associating assets with items: an asset links pane and a split pane view. These options are accessible on the Edit Item Layout dialog.

Asset Links Pane
For presenting large images to examinees on a computer screen, the maximum screen space should be used with the minimum amount of scrolling. Asset Links can be used to achieve this by displaying assets in an overlay dialog that will appear when a link is clicked.
- To turn on the asset links pane, open the Edit Item Layout
- Check the box labeled “Add a fixed pane to the top of the item for asset links”
- A new pane shown below will appear above the item stem.
Figure 3.24: Asset Links Pane
Clicking Add Link will bring up the Asset Manager, where you will select the Asset to link to. After clicking Insert, an input box will appear where you can enter the text of the link that the examinee will click on to view the overlay. Clicking the name of the asset below the input allows you to view the asset and clicking Remove will delete it.
Split-Pane View
An item can be displayed using a split pane view. One side of the view would contain the item stem and answers and the other side would contain one or more embedded assets. This is especially useful in displaying reading passages alongside items.
- To turn on a split-pane view, click on Layout, and check the box labeled “Add a separate pane for embedded assets.”
- Choose between the two split pane types:
- horizontal (top/bottom split)
- vertical (left/right split, as shown below)
- A new pane will appear in the item editor.
Clicking Embed Asset will bring up the Asset Manager, where you will select the Asset to embed. Upon inserting, the asset will appear embedded in the pane (shown below). Click Remove to delete it.
Figure 3.24: Item with Vertical Split-Pane

You can control the percent of the screen height/width that the assets pane will use by dragging the re-sizer or entering a number in the input. The pane will scroll as needed when presented to the examinee.
- Note that the size of the panes as seen in the item editor does not necessarily reflect what the examinee sees. The item editor reflects how the item will appear to the examinee on the smallest supported resolution (1024×768).
- If the examinee has a larger monitor, the test engine will take advantage of all of the screen space to minimize the presence of scrollbars. To get the best representation of how an item will appear to an examinee, always preview the test.
Embed Asset in Multiple Items in One Operation
If multiple items are going to use the same asset, the assets can be embedded in one operation.
- Create the items without adding the assets.
- In the Item Explorer tab, highlight the items that will use the same asset
- Use the Shift and Ctrl key functions for multiples
- You can control the percent of the screen height/width that the assets pane will use by dragging the re-sizer or entering a number in the input. The pane will scroll as needed when presented to the examinee.
- Note that the size of the panes as seen in the item editor does not necessarily reflect what the examinee sees. The item editor reflects how the item will appear to the examinee on the smallest supported resolution (1024×768).
- If the examinee has a larger monitor, the test engine will take advantage of all of the screen space to minimize the presence of scroll bars. To get the best representation of how an item will appear to an examinee, always preview the test.
- Note that the size of the panes as seen in the item editor does not necessarily reflect what the examinee sees. The item editor reflects how the item will appear to the examinee on the smallest supported resolution (1024×768).
- Right-click and select Embed Assets. This will open the window shown in the figure below.
- Select Add a separate pane for embedded assets
- Select a Horizontal or Vertical split
- Click Add Asset, this will open the Asset Manager window
- Select the asset to embed and click Add. You may now close the Asset Manager window.
- Click Save
- In the Item Explorer tab, highlight the items that will use the same asset
Embed Assets in Multiple Items
If items have the same configuration of linked and/or embedded assets and are placed next to each other in a test, they will appear together on the same page. Currently, a maximum of 8 items can be on the same page in this way.
- Randomizing the item order when the test is delivered will prevent this page sharing from taking place as the items will likely no longer be adjacent. This problem will be solved with the new notion of Test Sections in a future release.
- Note: this page sharing is similar to how Likert items using the same scale will be presented on the same page.
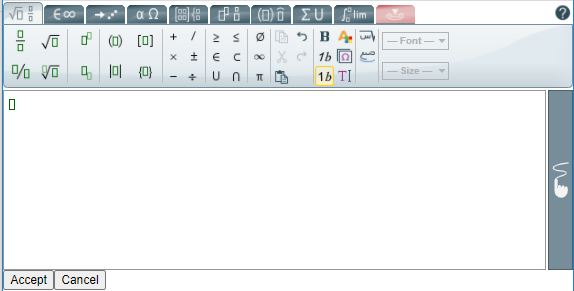
The Equation Editor
FastTest comes with an equation editor built into the content tab ( ![]() ). When pressed, the Equation Editor dialog (shown below) will appear and the user can create equations.
). When pressed, the Equation Editor dialog (shown below) will appear and the user can create equations.
- The Image Font Size provides some control on the font size in the outputted image. (The image can be resized later, as well, like any other image.)
- Once the equation has been created, clicking Add will save the equation as an image and insert it into the item text at the last known cursor position.
- Existing equations can be edited by double clicking the equation image.
Figure 3.26: Insert Equation Dialog
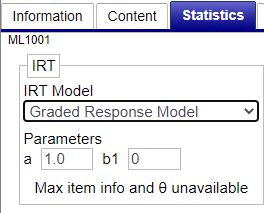
The Statistics Tab
Figure 3.27: Edit Item Dialog – Statistics Tab
The Statistics Tab contains fields for item statistics, whether classical, item response theory (IRT), or user-defined. These can all be simply typed into the appropriate text boxes.
- To enter IRT statistics (called parameters in that context), select the relevant IRT model from the drop-down menu.
- “User Stat” fields provide a place for any statistics other than the common ones already specified.
- These labels can be customized in Items tab of the Configure Workspace dialog by the workspace administrator.
The graph on the right shows the item response function or item information function, whichever is selected in the drop-down menu above. You can view and export the actual values for these graphs by clicking the View Data button in the upper right.
Graded Response Model (GRM)
To import parameters for the Graded Response Model (GRM) for multiple items:
- Change one item to the GRM (as shown below) and hand enter the parameters. Save and close
- Run a metadata export – this will provide the file that can then be used to import additional metadata
- Add the parameters to items that require them. Save file.
- Import metadata
Comments Tab
The comments tab is an open place for comments on the item. Users with the Item Reviewer role can record comments on items but are unable to modify any fields. FastTest automatically records the date the comment was made and the identity of the commenter. Clicking one of the comment buttons will bring up the comment dialog. Unlike other dialog in FastTest, this dialog will not block interaction with the background so the commenter is free to to change tabs in the Edit Item dialog.
Review Tab
The review tab summarizes the values for custom item fields marked for review. The data is presented in a tabular format: columns are custom item field (used for review) and rows are users. This tab is only accessible to workspace administrators and bank managers. See Reviewing.
Objectives Tab
The objectives tab presents the objectives or guidelines that have been defined for the category to which the current item belongs. The purpose of this tab is simply to provide guidance to item writers. If categories of content in your testing program do not have specific objectives, this tab can be ignored.
Rubrics Tab
The rubrics tab allows users to access rubrics, which can only be created when Item Marking has been activated by an Administrator by editing the workspace.
- From the workspace homepage click Edit
- Go to the License tab
- Check the box Allow Online Marking
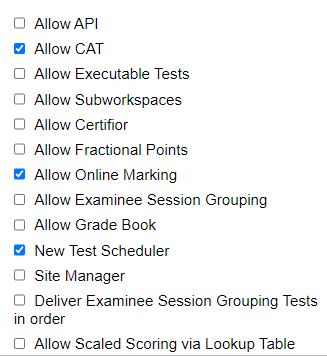
- There will now be an Item Marker tab within the workspace, as shown below

Rubrics are useful for hand scoring items, such as short answer or essay response types, within the system.
Creating Rubrics and Defining Scores
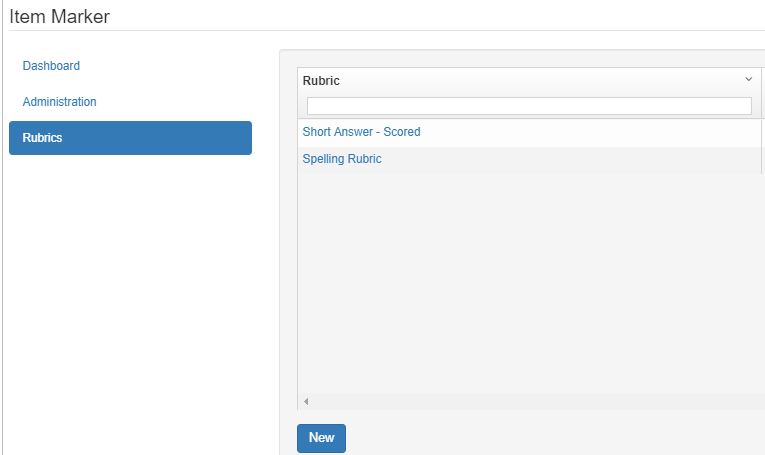
- Under the Item Marker tab click on create/edit rubrics
- Note: Only Admins are allowed to create rubrics. Non-admin users can assign and mark rubrics.
- Clicking Create New Rubric results in the screen shown below
- Enter a name and description of the scoring rubric
- Click Create score to add score options for the rubric
- Enter a name
- Select the desired score
- Provide a description
- The Explanation box can be used to provide examples of an examinee response that warrants the score
- Create multiple score options for each rubric
- Scores range from 1 to 5
- Once all score options are created click Save Rubric
- Saved rubrics will be displayed under the Create/Edit Rubrics link
- The example below is for a spelling rubric. The score created would provide a score of 5 indicating the student’s response contained 1 or fewer spelling errors.

Assigning and Marking Rubrics
- Once a rubric has been created it can be assigned to an item
- Note: The scoring for the item must be set to Hand Scored
- Under the Content tab Click on the Scoring button and select Hand Scored
- Note: Once assigned to an item the rubric can no longer be edited
- Note: The scoring for the item must be set to Hand Scored
- From the Edit Item dialog under the Rubrics tab click Add
- Select the rubric, click Save
- Once an item has been added to a test, protected, and delivered it will appear under the Item Marker tab as shown below.

- Selecting the box for the test session will cause individual items within that test to appear below
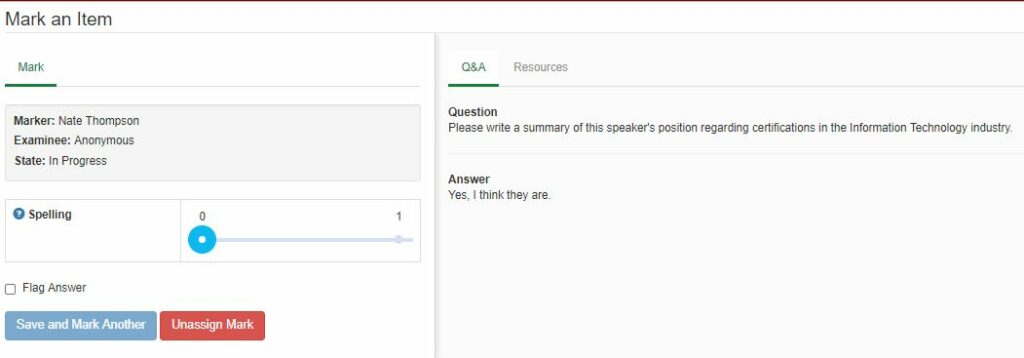
- Once an item is selected, click the Assign or continue marking item button, resulting in the Mark an item page shown below
- The question and examinee’s response are shown on the right side
- Mark, or score, the response by selecting from the score options on the left
- Clicking the
 will provide the description of the scores within the rubric
- Clicking the
- Once all of the items within a protected test have been scored via the Item Marker tab the examinee’s test will need to be re-scored.
- This can be done under the Test Scheduler tab
Multiple Markers
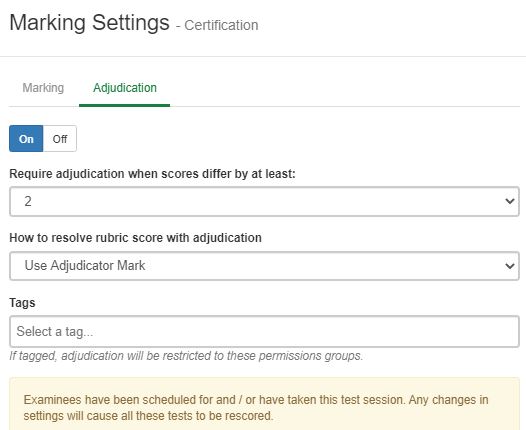
If you have a marking situation where you need more than one person to mark each student response (such as two teachers reading each student essay) this can be enabled with the Marking Scheme drop-down on the Marking Settings screen, as shown below.
- To access Marking Settings, click on the Rubric name from the Administration page.

- Because a student will receive only one score on each rubric, the subsequent drop-down specifies how to deal with this if the markers disagree: use the average mark or the highest mark.
 For example, if one teacher gives a mark of 2 points on grammar and the other gives a 3, the final score can be 2.5 or 3. Note that if you use IRT to score the tests, the model only accepts whole numbers.
 For example, if one teacher gives a mark of 2 points on grammar and the other gives a 3, the final score can be 2.5 or 3. Note that if you use IRT to score the tests, the model only accepts whole numbers.
A third approach to dealing with marker disagreement is adjudication. This refers to bringing in an additional marker to provide another rating. That rating can then be included in the average, or serve as the final mark for the student response; this is selected in “How to resolve rubric score with adjudication.” As an administrator, you have a choice of score difference to require adjudication.